Getting started
This is the gentlest path into SvGrid Studio. By the end you will have a real, working Customers screen - a grid you can sort, filter, and page, with a create / edit form and delete - running on your machine. No prior experience with SvGrid is assumed.
If you would rather just click around first, open a live demo - no install needed:
- Studio live SQL - the whole stack in the browser, backed by real Postgres via PGlite
- Supabase - connect your own hosted Postgres
- The designer itself - open a sample app and edit it, nothing to install
Choose your tutorial. This page needs no database and teaches the whole shape; the one-page tutorials build the same screen against a real backend. They all end in the same place, so pick by what you have:
| You have | Follow | What it adds |
|---|---|---|
| Nothing yet | this page | the full path: install, schema, generate, run, change |
| A Postgres connection string | Postgres CRUD grid | a server route querying your database |
| A Supabase project | Supabase CRUD grid | browser client, keys, Row-Level Security |
| An HTTP / JSON API | REST CRUD grid | the REST adapter, no server route at all |
| An afternoon | Build a CRM | multi-entity: relations, master-detail, a real DB |
Guided path - answer a few questions, get the app
If you already know where your data lives, let Studio ask:
npx @svgrid/studio init
It asks four things - where the data comes from (sample data, your database, in-browser Postgres, or a REST API), which tables you want, which pages each table gets, and what it should look like - then writes a runnable SvelteKit app with a list, an edit form and a record page per table, plus an overview dashboard.
Pointing it at a real database is one line, and Studio installs the driver for you:
npx @svgrid/studio init --db postgres --url $DATABASE_URL --out my-app
On Supabase there is no driver to install at all - it is read over the project's REST API:
npx @svgrid/studio init --supabase-url https://xxxx.supabase.co --supabase-key $SUPABASE_ANON_KEY
Prefer clicking? The visual designer has the same wizard behind its New app button - or open svgrid.com/studio/new to start one in the browser. Both paths run the same generator, so they produce the same app. See The Studio CLI for every flag.
Fastest path - a downloadable, ready-to-run example
Rather have a working project on your machine than type code into a blank file? One command scaffolds a complete SvelteKit app with everything already wired up:
npm create @svgrid/studio@latest my-app
You'll be asked to pick a theme - one of @svgrid/grid's 19 built-in
presets (shadcn, Tailwind, Material, Excel, Fluent, and more) - and whether to
start in light or dark mode. Scripting this instead? Both are flags:
npm create @svgrid/studio@latest my-app -- --theme material --dark
Then:
cd my-app
npm install
npm run dev
Open http://localhost:5173. You get:
- A nav shell and a home page (
src/routes/+layout.svelte). - Two linked entities - Customers and Orders - each a full grid + modal create/edit/delete screen. Orders has a searchable lookup back to Customers, so you can see how relations work.
- Seeded in-memory data - nothing to install or configure, no database.
- The theme and mode you picked, applied to the whole app - not just the grid.
It is a real project, not a read-only demo - edit it, add fields, connect a database, deploy it. A few places to start:
| Want to... | Edit |
|---|---|
| Add or change a field | src/lib/schemas.ts - the grid and the form update together |
| See how a screen is built | src/lib/EntityScreen.svelte - the reusable grid + modal CRUD screen every route uses |
| Connect a real database | src/lib/data.ts - swap createInMemoryDataSource for createSqlDataSource / createSupabaseDataSource (see Databases) |
| Add another screen from a live table | npx @svgrid/studio add invoices --db postgres --url "$DATABASE_URL" |
The template's own README.md covers the same ground once you're in the
project. Prefer to see each piece built up by hand instead, or add a screen to
an existing app rather than a fresh one? Continue below.
Three ways to build - pick yours
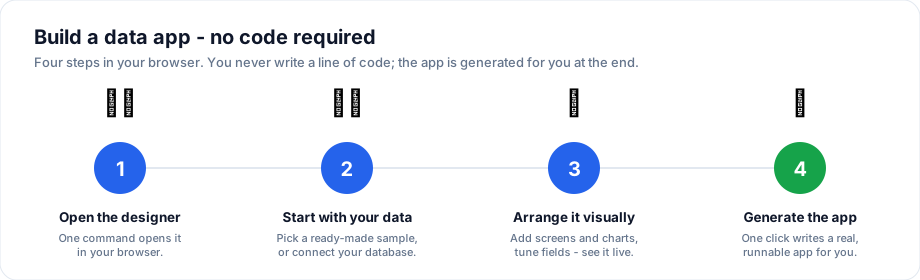
This is the visual designer - a screens list on the left, your data previewed live in the middle, and simple property panels on the right. You point, click, and press Generate:
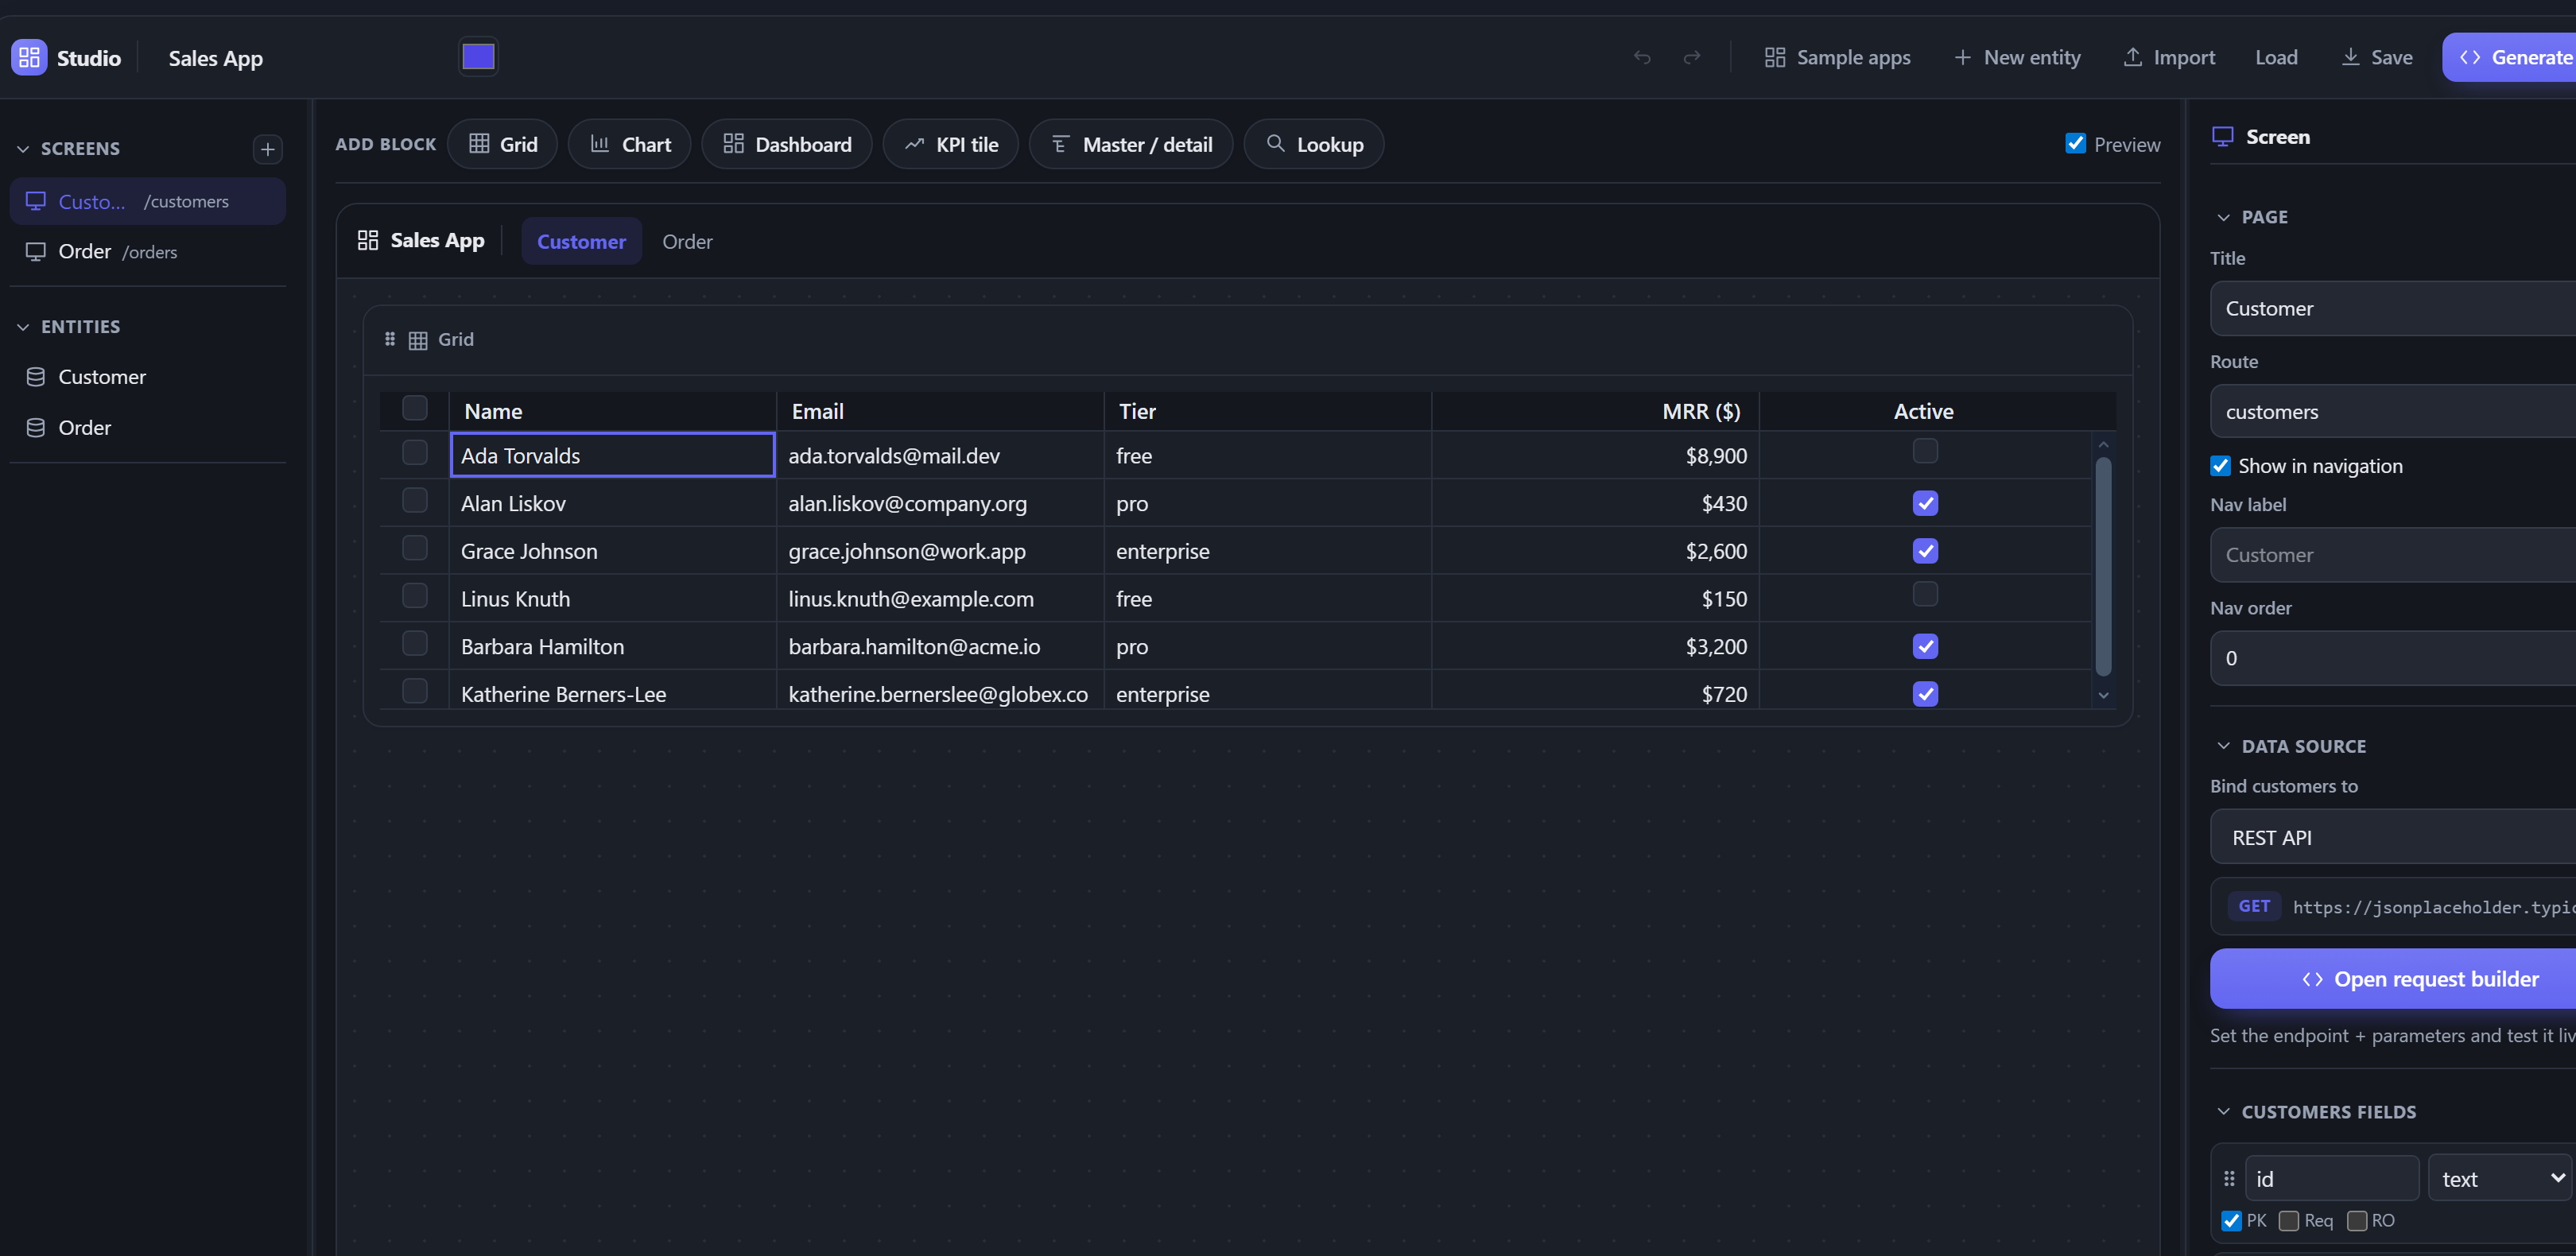
- Visual designer (no code). You never write code - you point, click, and preview, then press one button to generate the finished app. Try it immediately, no install, at svgrid.com/studio - or run it locally with Launch the designer, which auto-saves to disk and generates straight into a folder. The sample apps let you open a complete, realistic app in one click and point it at your own data.
- CLI. One deterministic command per screen:
npx @svgrid/studio add ...introspects your table or schema and writes the files. No AI involved. This page uses the CLI from Step 3 on - continue below. - AI via MCP. With
@svgrid/mcpconfigured, ask your coding agent to build the screen; it introspects, scaffolds, and compile-verifies through the same core the CLI uses.
All three produce the same generated code - pick whichever fits how you work, and switch freely later.
What you need
Node.js 18 or newer. Check with
node -vin a terminal. If that errors, install Node first.A terminal and a code editor (VS Code is fine).
A SvelteKit app. Don't have one? Create one in 30 seconds:
npx sv create my-app     # pick "SvelteKit minimal", TypeScript: yes
cd my-app
npm install
You do not need a database to start - the first screen below runs on in-memory data. You can point it at PostgreSQL, Supabase, MySQL, and others later without changing the UI.
Step 1 - Install
Inside your app folder:
npm i @svgrid/grid @svgrid/enterprise
@svgrid/gridis the grid itself.@svgrid/enterpriseadds Studio: the schema, the edit form, and the data-source helpers. No key is needed to evaluate it; loaded without a key it displays a watermark and a console message about the Enterprise package, and everything still runs. See licensing.
Step 2 - Describe your data once
The generator needs one description of your table. If you have a live database it can introspect it directly (Step 3 shows that variant). Here we stay database-free: describe the table in a small Drizzle schema file, which the generator reads as text - it never connects to anything.
npm i -D drizzle-orm
(drizzle-orm is only there so the schema file type-checks; nothing runs
against a database. It is also the natural next step when you do add one.)
Create src/lib/db/schema.ts:
import { pgTable, text, integer, boolean } from 'drizzle-orm/pg-core'

export const customers = pgTable('customers', {
  id: text('id').primaryKey(),
  name: text('name').notNull(),
  email: text('email').notNull(),
  tier: text('tier').notNull().default('free'),
  mrr: integer('mrr'),
  active: boolean('active'),
})
A Prisma schema.prisma works the same way. Prefer to write Studio's own
model - the EntitySchema - by hand instead? That is the
appendix at the bottom of this page.
Step 3 - Generate the screen
One command:
npx @svgrid/studio add customers --from src/lib/db/schema.ts
Have a live database instead? Same command, different source - no schema file needed:
npx @svgrid/studio add customers --db postgres --url "$DATABASE_URL"
Either way it writes three files, and the screen is done. A quick tour of what you now own:
1. src/lib/customers.schema.ts - the model. The generator turned your
table into an EntitySchema - the single object that drives the grid columns,
the form fields, and validation:
export type CustomersRow = {
  id: string
  name: string
  email: string
  tier: string
  mrr: number | null
  active: boolean | null
}

export const customersSchema: EntitySchema<CustomersRow> = {
  name: 'customers',
  idField: 'id',
  fields: [
    { field: 'id', type: 'text', primaryKey: true, readonly: true },
    { field: 'name', type: 'text', required: true },
    { field: 'email', type: 'text', required: true },
    // ...
  ],
}
Every field option (labels, enum choices, min/max, regex, custom validators) is explained in The EntitySchema.
2. src/routes/api/customers/+server.ts - the API route. A
ServerDataSource (read + create + update + delete) exposed over one SvelteKit
endpoint. With --from it starts in-memory so it runs immediately; with --db
it is already wired to your database:
const source = createInMemoryDataSource<CustomersRow>([], customersSchema)

export const { POST } = createKitHandlers({ schema: customersSchema, source })
Swapping in a real database later means replacing that one source line - the
page never changes. See Databases.
3. src/routes/customers/+page.svelte - the screen. The grid with
server-side sort, filter, global search, a native pagination footer,
multi-select delete with optimistic updates, and a modal create / edit form -
all reading through the API route:
const source = createKitDataSource<CustomersRow>({ endpoint: '/api/customers' })
const columns = schemaToColumns(customersSchema)
const controller = createServerDataSource<CustomersRow>(source, {
  pageSize: 25, optimistic: true,
  getRowId: (r) => String(r.id),
  onChange: (s) => (state = s),
})
Each file wraps its generated body in // svgrid:managed:start /
// svgrid:managed:end markers. Everything you write outside the markers
is yours; re-running add only rewrites what is inside. That is what makes
Step 5 safe.
One thing the generated screen inherits from your page: the font. A bare
npx sv createapp sets no CSS at all, so add abody { font-family: system-ui, sans-serif }rule (or a--sg-fonttoken) once, or the page renders in the browser's default serif. Borders, backgrounds, and hover states the grid themes itself.
Step 4 - Run it
npm run dev
Open the URL it prints (usually http://localhost:5173) and go to
/customers. With --from the grid starts empty (in-memory source, no
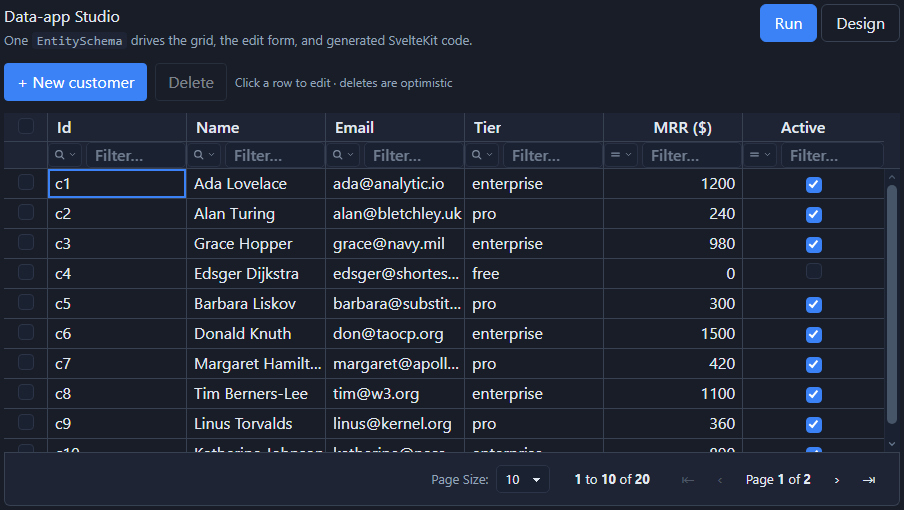
seed) - click New and add two or three customers, then try the screen:
- Click a column header to sort.
- Type in the filter row under a header to filter (it stays focused as you type).
- Click a row to edit. The form validates as you type - clear a required field and watch it complain.
- Select rows with the checkboxes and Delete them - the grid updates instantly and rolls back if the server says no.
- Page through with the native pager at the bottom.
Step 5 - Change something
Because the schema drives everything, changes are one edit. Add a column to
src/lib/db/schema.ts:
country: text('country'),
Then re-run the exact same command:
npx @svgrid/studio add customers --from src/lib/db/schema.ts
The managed regions are regenerated: the grid gets a Country column and the
edit form gets a Country input. Anything you wrote outside the
svgrid:managed markers - extra buttons, styles, handlers - is untouched.
That round trip (change schema, re-run, keep your code) is the everyday
workflow; Code generation explains the rules.
Prefer not to re-run the generator? Editing the generated
customers.schema.ts directly works too - grid and form update together from
the one schema object.
Where to go next
You have the whole shape now. The usual next steps:
- Understand the model - Concepts walks the pipeline (schema, screens, data source, codegen) once and defines every Studio term.
- Connect a real database - re-run
addwith--dband a connection string, or swap the onesourceline in the API route; the page does not change. For Supabase, follow the one-page Supabase CRUD grid tutorial; for SQL, see Databases. - Design visually -
npx @svgrid/studio designeropens the full app builder: compose screens across entities, bind data, and click Generate app. See the Visual app designer. (To embed a single-entity schema editor in your own app, see the Schema designer.) - Build a full app - the Build a CRM tutorial wires up companies, contacts, and deals with relations and master-detail.
Appendix: wire it by hand (no generator)
Everything the generator wrote in Step 3 can be built up by hand - useful when you want to see exactly how the pieces fit, or to embed a Studio screen in an unusual spot. Two files replace the three generated ones (no API route: here the data source lives in the page itself).
First, the EntitySchema - Studio's own model, the object the generator
derived from your Drizzle file. Create src/lib/customers.ts:
import type { EntitySchema } from '@svgrid/enterprise'

export type Customer = {
  id: string
  name: string
  email: string
  tier: 'free' | 'pro' | 'enterprise'
  mrr: number
  active: boolean
}

export const customersSchema: EntitySchema<Customer> = {
  name: 'customers',
  label: 'Customer',
  idField: 'id',
  fields: [
    { field: 'id', type: 'text', primaryKey: true, readonly: true },
    { field: 'name', type: 'text', required: true, minLength: 2 },
    { field: 'email', type: 'text', label: 'Email', required: true, format: 'email' },
    { field: 'tier', type: 'enum', options: [
      { value: 'free', label: 'Free' },
      { value: 'pro', label: 'Pro' },
      { value: 'enterprise', label: 'Enterprise' },
    ] },
    { field: 'mrr', type: 'number', label: 'MRR ($)', min: 0 },
    { field: 'active', type: 'boolean' },
  ],
}
Then the page. createInMemoryDataSource provides the ServerDataSource
contract over a plain array, createServerDataSource runs sort / filter /
page / CRUD against it, and the grid + edit panel render it. Create
src/routes/customers/+page.svelte:
<script lang="ts">
  import { SvGrid, createServerDataSource, type ServerState } from '@svgrid/grid'
  import { SvGridEditPanel, createInMemoryDataSource, schemaToColumns } from '@svgrid/enterprise'
  import { customersSchema, type Customer } from '$lib/customers'

  const seed: Customer[] = [
    { id: 'c1', name: 'Ada Lovelace', email: '[email protected]', tier: 'enterprise', mrr: 1200, active: true },
    { id: 'c2', name: 'Alan Turing', email: '[email protected]', tier: 'pro', mrr: 240, active: true },
    { id: 'c3', name: 'Grace Hopper', email: '[email protected]', tier: 'enterprise', mrr: 980, active: true },
  ]

  const columns = schemaToColumns(customersSchema)
  const source = createInMemoryDataSource(seed, customersSchema)

  let view = $state<ServerState<Customer>>({
    rows: [], total: 0, loading: false, saving: false, error: null,
    pageIndex: 0, pageSize: 10, pageCount: 1, sortModel: [], filterModel: {},
  })
  let editing = $state<Customer | null | undefined>(undefined)
  let genId = 4

  const controller = createServerDataSource(source, {
    pageSize: 10, optimistic: true, getRowId: (r) => r.id,
    onChange: (s) => (view = s),
  })
  controller.refresh()

  async function save({ mode, id, values }) {
    if (mode === 'create') { await controller.createRow({ id: `c${genId++}`, ...values }); controller.setPage(view.pageCount - 1) }
    else if (id) { await controller.updateRow(id, values) }
    editing = undefined
  }
</script>

<style>
  :global(body) {
    font-family: ui-sans-serif, system-ui, -apple-system, "Segoe UI", Roboto, Helvetica, Arial, sans-serif;
  }
</style>

<button onclick={() => (editing = null)}>+ New customer</button>

<SvGrid
  data={view.rows} {columns} loading={view.loading}
  fitColumns enableRowSummaries={false}
  sortable externalSort onSortingChange={(s) => controller.setSort(s)}
  filterable filterMode="row" externalFilter
  onFiltersChange={(f) => controller.setFilter({
    global: f.global || undefined,
    columns: Object.fromEntries(f.columns.map((c) => [c.id, { operator: c.operator, value: c.value, valueTo: c.valueTo, selectedValues: c.selectedValues }])),
  })}
  onRowClick={(e) => (editing = e.row)}
  showPagination externalPagination
  rowCount={view.total} pageIndex={view.pageIndex} pageSize={view.pageSize}
  onPaginationChange={({ pageIndex, pageSize }) => pageSize !== view.pageSize ? controller.setPageSize(pageSize) : controller.setPage(pageIndex)}
/>

{#if editing !== undefined}
  <SvGridEditPanel schema={customersSchema} row={editing} presentation="modal"
    onSubmit={save} onCancel={() => (editing = undefined)} />
{/if}
The <style> block is just a plain font reset - a fresh npx sv create app ships no CSS
at all, so without it the page falls back to the browser's default serif font. <SvGrid>
and <SvGridEditPanel> already theme their own borders, backgrounds, and hover states out
of the box (via --sg-* tokens with built-in fallbacks) - font is
the one thing they intentionally inherit from the page rather than force, so it fits
whatever type your app already uses. If your app already sets a body font (or a
--sg-font token), skip this block.
See also
- SvGrid Studio overview
- Concepts - the mental model + glossary
- Data binding - the
ServerDataSourcecontract in depth - Edit forms & validation
- Troubleshooting & FAQ
Live examples
- SvGrid Studio · live SQL - The Studio stack backed by a REAL Postgres running in the browser via PGlite (WASM), no server. createSqlDataSource turns the grid's sort / filter / page requests into parameterized SQL run through PGlite; the executed query is shown live under the toolbar. Full CRUD with optimistic updates against actual Postgres.
- SvGrid Studio · Supabase - The Studio stack over hosted Postgres on Supabase, straight from the browser via supabase-js (PostgREST) and your project's public anon key. createSupabaseDataSource maps the grid's sort / filter / page / CRUD onto the query builder, introspectSupabaseTable adapts to any table AND detects foreign keys (a FK column auto-becomes a searchable lookup in the form), and createSupabaseRealtime makes it LIVE - change a row in the Supabase dashboard and it flashes in the grid (toggle the Live pill). Paste your URL + anon key, run the one-time setup SQL, done. RLS keeps the anon key safe.
Related articles
- SvGrid Studio Tips and Tricks: Build Svelte Data Apps, Fast - Practical SvGrid Studio tips - AI app generation, a designer that emits real SvelteKit, schema-driven edit forms, code-behind with ctx.grid, production auth/data/deploy toggles, and real data-source binding - each with a snippet.